Informative Guide in Fence Painting: Mistakes to Avoid

Admin • January 23, 2023
Ongoing old fence restoration project in a residential property, including cleaning and fence painting in Townsville QLD.

Whether trying to restore your old fence or build a new one, you will want to avoid inevitable mistakes while painting it. If you do, your project could be a complete disaster. This article will cover a few of the most common mistakes to watch out for in fence painting.


Preparing the wood

Whether installing a new wooden fence or wanting to change the colour, you'll need to prepare the wood before painting a fence. The process isn't complex, but there are a few things to keep in mind to get the best results.


The first step to preparing the wood before painting a fence is to remove all the decorations and loose nails. It is also a good idea to power wash the fence to remove mould or mildew.


If the paint on the fence is a bit dull, consider using a sanding sponge to clean it. You can also use a paint remover to help scrub the old paint. A wire brush or a fan head will work if you do not have a sanding sponge. It's best to use medium-grit sandpaper. This will provide a smooth finish and ensure no dirt or debris is in the cracks.


The next step is to sand the wood. The purpose of sanding is to provide an even finish and to prepare the surface for paint. Fine-grit sandpaper will give you a polished finish, but medium-grit sandpaper will give better coverage.


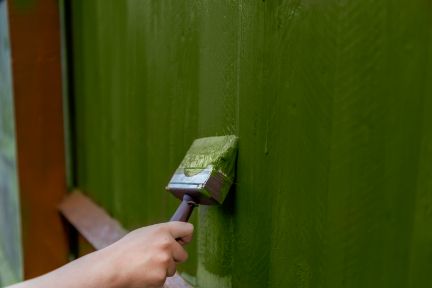
Once you've sanded the wood, you can begin applying the primer. You'll need to wait for the primer to dry before painting. To apply the primer, you'll need a paintbrush or roller. You'll need to apply the primer with vertical strokes for vertical panels.


Choosing the right fence paint is crucial. Oil-based paints offer a beautiful finish but don't offer the same protection as acrylic. It's also essential to choose the right paint brand. You'll need to research reputable brands. If you need to gain experience painting exteriors, it's best to hire a professional to do the job.


However, the most critical part of preparing the wood before painting a fence is to do it properly. If you skip this step, you can expect a subpar finish. If you do it correctly, you'll have a gorgeous fence.


Choosing the right paint and application method

Choosing the right paint and application method for a fence can be challenging. Aside from the colour and paint type you choose, it is also essential to consider the weather and how the wood is exposed to the elements. Suppose you live in an area with high humidity, select water-based paint.


If you use oil-based paint, you will need to apply multiple coats. You should start with a primer and allow it to dry thoroughly before painting the fence. You can then use a paint roller or brush to complete the job.


If you are using spray paint, you must choose a specially formulated product. Ensure that the weather is dry and that you are not spraying in windy conditions. The spray will provide an even covering and a smooth finish for your fence.


Before you begin, check the fence for holes, rust, or damaged wood. Repair any broken pieces. Let's replace loose nails and ditches underneath the fence.


The best time to paint a fence is in the spring or summer. The weather should be mild and dry, and the temperature should be between 40 and 90 degrees Fahrenheit. This will allow the paint to set better and to stay fresher longer. You should also avoid painting the same area more than once. You will also want to test the paint on a small fence patch to ensure it is safe for outdoor use.


If your fence has a lot of crannies and crevices, use stain. This is easier to apply than paint and will last longer. However, it does not offer the same level of protection as paint.


After you have completed your fence, you can use a protective coat to help the paint last longer. You can purchase latex or oil-based paint resistant to stains and mildew. It would be best if you also looked for paint that matches the exterior colour of your house.


Waiting for the fence to dry completely

Whether you are painting a fence, restoring a damaged one, or replacing it with a new one, you will need to wait for the wood to dry before you can put your favourite paint on it. It will help you get the job done if you plan and do it right the first time. If you are painting a pressure-treated wood fence, you may have to wait up to two months for it to dry thoroughly.


Before you start, remove any dirt, debris, or other foreign matter that may hinder the process. Using a rag or roller pan, you should brush off loose bits of paint. You can also use a diluted bleach solution to kill mildew. Good quality paint should only need a single coat.


The best time to stain your fence is when it isn't raining. This gives you more time to work on your project and ensures that your paint will apply smoothly. Please also consider the weather forecast for the next few days. Consider waiting until the next rainy season if the forecast is terrible. Similarly, you should wait until winter if you live in the northern hemisphere.


There are many different types of fence stains. Some are oil-based, while others are water-based. This means you will have to be careful about choosing which ones. The good news is that you can usually find them at most hardware stores.


You will need a brush, sprayer, or roller pan to apply the stain. Wear safety glasses, gloves, and a face mask to protect yourself from any possible hazard. It would help if you also were mindful of the wind, as you don't want to be blown off your feet when applying the stain.


Cleaning the fence after painting

When you paint your fence, it is essential to clean it beforehand. This will help protect your fence from the elements and keep it in good shape.


You can also use a homemade solution to get the job done. You can mix white vinegar and water and apply it with a sponge or scrub brush. Let it sit for about 15 minutes. Then, rinse it off with your garden hose.


You can also buy a wood cleaner to remove mildew and algae. This can be purchased at a local hardware store. You should follow the directions on the container for how to use it.


If you are using a commercial cleaner, you must ensure that you have the right setting for cleaning. You can also ask if the cleaner is eco-friendly. If you have a pressure washer, use a lower setting. If you are careful, you can protect your fence.


If you plan to use oxygen bleach, you will need to dilute it according to the manufacturer's instructions. You will want to wash your fence with oxygen bleach for about 15 minutes. Afterwards, you must scrub it off with a plastic bristle scrub brush. After rinsing, you can then paint the fence.


You can always hire a professional cleaning service if you don't have a pressure washer. These services can clean your fence from top to bottom. They will arrive on time and will be sure to deliver a quality finish. They can even clean other areas around your home.


When painting a wood fence, you should make sure you have a quality finish. This can be a time-consuming process. It's also essential to think about the colour as your fence weathers. Your fence could lose value and turn off potential buyers if you don't.


You must check the fence for rot before you begin painting it. If you find rot, replace the affected boards with new ones. This will prevent minor rot from spreading.


Thanks for reading our blog! We hope the information in this post has been helpful. If you want a fence professionally painted in your yard, we urge you to call our company at 07 4448 3176. Our staff is always eager to help with any questions or concerns you may have about painting a fence. We have been in business for years and are proud to have a reputation for excellence in the fence painting industry. We look forward to hearing from you!

You might also like

By Admin August 25, 2024
Whether you have a new roof , a roof that needs a coat of paint, or a roof that needs repairing, you'll want to know some tips for choosing a roof painting expert. These tips will help you find a professional who can get the job done right the first time. Preparing the roof for painting Getting your roof painted is an excellent way to increase the lifespan of your roof and cut down on your energy bills. Painting your roof will also help keep the entire home cooler in warm months. Before you start, be sure to clean the roof to remove dust and dirt. This will help the paint adhere to the roof better. A good quality primer will also help with the job. This is because it will make it easier to paint the topcoat. It will also help protect the paint from the elements, such as rain. The best primers will also have a low odour and will not flake or peel. It is also important to consider the climate of your area. If you live in an area with lots of wind, you may want to hold off on spraying your roof until the weather cools off. Painting your roof is a big job that will take you several weekends to complete. You may want to hire a roofing expert to help you with the task. This will help make sure that the job gets done properly. Also, it can be very dangerous to paint your roof without experience. A roofing safety harness can help keep you safe. These are often sold online. You will also want to ensure that the harness is non-slip. A good quality primer is also the best way to ensure a perfect finish. This is especially important for bare uncoated roof tiles. This is because the best way to paint a roof is to ensure that the paint will properly adhere. This will also help to reduce the likelihood of mould and mildew developing. You may also want to look into adding insulation to your roof. This is an inexpensive way to help reduce your energy bills. Also, consider adding a waterproof coating to your roof. This will protect the paint from the elements and keep it looking newer for longer. Finally, you may want to consider a tape test to determine the best paint film for your roof. This will show you which areas of your roof need special attention. Acrylic latex, a water-based paint formulated specifically for roofs Whether you're renovating your house or want to improve the appearance of your property, there are several different types of acrylic latex, water-based paint formulated specifically for roofs. They all provide superior protection against weather damage, mould, and mildew. They also offer a wide range of colours and finishes, making them suitable for a variety of different applications. Thermobond HRC is an ultra-premium water-based acrylic that offers enhanced durability and weatherproofing. It also provides a highly reflective surface that prevents the sun's heat from penetrating your roof. The coating dries fast and can be easily applied around all flashings and seams. Another high-quality product is General Paint, which provides good coverage and is easy to apply. It also has a low odour and dries in 30 minutes. It can be used on many different surfaces, including wood, masonry, and metal. It has a long lifespan and a 10-year warranty. High-Tensile Acrylic 211 is the best solution for custom tint roof coating applications. It has excellent tensile strength and elongation. This makes it a great protective membrane for metal roof surfaces. It also offers a wide range of custom colours and is a central component of the Met-A-Gard+ System. Thermobond HRC also offers excellent protection against heat and pollution. It can be applied on a wide range of surfaces, including metal, concrete, masonry, and wood. It is a durable coating that will protect your roof from the elements for many years to come. The BRILLIANCE family of additives offers improved heat absorption and brighter roofs. They are formulated with zinc-oxide-free chemistry, which means they reduce the heat absorption by traditional metal roofs. They also provide better UV resistance and brighter colours, which can make your roof brighter and more appealing to the eye. They also reduce the heat absorption of reflective roofs. These acrylic latex water-based paints are formulated to adhere well to many types of roof substrates, including wood. They also provide a beautiful, textured finish. They conceal minor surface imperfections, such as cracks and blemishes. They are ideal for industrial and commercial applications. They are also suitable for highways, homes, and medium-rise buildings. Spray paint method Using a spray paint method for roof painting can save you time and money. Aside from saving time, it can also help you maintain your roof and extend its life. In addition, it can make your house more energy-efficient. To get the best results, you need to use the right product, the right tools, and the right technique. You'll also need to follow certain safety tips. For example, wear a safety harness, non-slip shoes, and an extension ladder. Also, ensure that you wear a full-body suit. The best way to paint a roof is by using an airless sprayer. It's also the fastest. However, it's not without its drawbacks. For example, it may be impossible to get all the paint to cover the surface. Also, the paint may not adhere to the roof properly. This is especially true if the roof is hot. You should also clean your roof before painting. It's a good idea to use detergent or a hose to clean any built-up dirt. You may also want to cover vents and skylights with plastic sheets. You'll find them at hardware stores. Another good way to paint a roof is with a corrugated iron roller. Make sure the roller has a long handle. Also, make sure the roller is suited for the type of roof you are painting. You may also want to use a tack cloth. For a smooth finish, you should use multiple light coats. This is easier to do than one heavy coat. Using multiple light coats will also provide better coverage. The trick is to apply the coats in the order that makes the most sense to you. For the best results, you should also use a pro-style paint sprayer. It's also recommended to use an anti-spitting valve. If you don't, you'll end up with paint running everywhere. Another useful piece of equipment is a Graco Clean Shot Valve. This can be placed on any spray gun extension. You may also want to use a Wagnerer Anti-Spit Valve. When using the spray paint method for roof painting, keep in mind that you'll need to back-roll the freshly painted surface. Back rolling will help ensure that you get a smooth finish. Back rolling is also a good way to get rid of brush marks. Maintenance of a roof painting expert Depending on the climate of your area, you may need to consider painting your roof to maintain its appearance. It can be very expensive to replace your roof, so a few coats of paint can help its life span. However, if you are not interested in painting your roof yourself, there are other options that you can use. The best time to paint your roof is in the fall and spring. During this time, the weather is cool and the rain is not as prevalent, which will make the paint dry faster. The amount of time needed between coats will depend on the climate of your area, but you should allow a few days for each coat to cure. Make sure to use a specialised paint for your metal roof. Metal roofs are difficult to work on and they can get very hot. In addition, metal roofs should not be painted within six months of installation. If you notice any damage, it should be repaired before you paint the roof. The first step in roof painting is to remove any rust patches on your roof. Rust can be removed by scraping with a wire brush or by washing with soapy water. It is also important to use a paint that will allow repairs to individual shingles. It is also important to use a sealant to ensure everything is properly bonding together. The sealant will allow the shingles to move properly, and it will also help them to dry faster. This is especially important if you live in an area with lots of moisture. Leaving excessive moisture on the roof can lead to mildew growth. Painting your roof can be a long and tedious home improvement project, so it is important to do it right. You will need to prepare your roof and paint it carefully to ensure that it lasts for many years. You will also need to use ladders and scaffolding for the job. It will take several weekends to complete the project. But it is well worth it when you are happy with the result. Contact us today at  07 4448 3176  for roof painting.
By Admin July 25, 2024
Looking for a quick and easy way to update your home? painting is the perfect solution! Here are small paint projects that will make a big impact. From painting your front door to giving your cabinets a new coat of paint, these projects are sure to transform your space. So what are you waiting for? Get started today! The best way to update your home and get the most out of your renovation budget is to tackle the small projects first. These tasks will take the least amount of time and money but are the most effective at boosting your home’s value. How minor paint projects can make a huge difference to the look of your home. There's no denying that a fresh coat of paint can make a world of difference to the look of your home. But did you know that even minor paint projects can have a big impact? For example, painting your front door a bright, attention-grabbing colour can make a real statement. Or, if you're feeling adventurous, why not try painting a bold pattern on an accent wall? Small paint projects like these are relatively quick and easy to do, but they can transform the look of your home. So if you're looking for a way to give your space a fresh new look, don't underestimate the power of a little paint! The most important things to consider when choosing a paint. The first is the type of paint you want to use. There are a variety of paint types on the market, and each has its benefits and drawbacks. You'll need to decide what type of paint is best suited for the job. The second thing to consider is the colour of the paint. You'll want to choose a colour that compliments the rest of your home's decor. The third thing to keep in mind is the quality of the paint. You'll want to choose a paint that is of good quality so that it will last for years to come. How to choose the right colour for your home. There are many factors to consider when choosing the right colour for your home. The first step is to decide what mood you want to create. Do you want a warm and inviting space or a more modern and sleek look? Once you have an idea of the atmosphere you want to create, you can start to narrow down your colour choices. The next step is to consider the amount of natural light in your space. If you have a lot of windows and natural light, you can get away with bolder colours. If your space is more on the dim side, then lighter colours will help to brighten things up. Another thing to think about is the size of your space. Smaller rooms can feel cramped and busy with busy patterns or dark colours. Lighter colours and simpler patterns will help to make a small space feel larger. Finally, don't forget about your personal preferences! If you have a colour that you love, then go for it! Ultimately, you want to choose a colour that makes you happy and that you will enjoy looking at day after day. Should you hire a professional house painter? If you have a small paint job that needs to be done, you may be wondering if you should hire a professional house painter or not. There are a few things to consider when making this decision. First, how much experience do you have with painting? If you have very little experience, it may be worth it to hire a professional to avoid making any mistakes. Second, how big is the job? If it's a very small job, you may be able to do it yourself without too much trouble. Finally, how much money are you willing to spend? If you're on a tight budget, hiring a professional may not be an option. So, should you hire a professional house painter for a small paint job? It depends on your circumstances. If you have limited experience with painting, it may be a good idea to hire someone to avoid making any mistakes. However, if the job is very small and you're on a tight budget, you may be able to do it yourself. If you’re looking for a more affordable way to breathe new life into your home, then you’re in the right place. With just a little bit of elbow grease, you can give your home the facelift it deserves with these small paint projects. Contact us today at  07 4448 3176  to schedule your home painting consultation.
By Admin June 25, 2024
If you are considering painting your home, you need to know some basic painting tips. You want to ensure that you choose the right colour for your home, but you also want to make sure that you prepare your walls so that the painting process goes smoothly. In this article, I will offer some of the best tips that you can use for painting your walls. Preparation is everything Preparation is key to painting your walls. From removing clutter to selecting the right paint colours, you'll be rewarded with a room worthy of the big leagues. Taking the time to prep your space will not only save you a fortune in time and labour, but the results will be a cut above the rest. Ensure the room you are tackling is well-ventilated to avoid the usual dusty aftermath. Similarly, prepare for the inevitable occupants. A good rule of thumb is to allocate one day to this task. Having a checklist and a schedule will prevent you from making blunders when they happen. It's also a good idea to consider the possibility that you'll be working in the area for a few days and may want to snag some quality shut-eye. Alternatively, enlist the services of a reputable painter and you'll be well on your way to a new home in no time. Regardless of whether you hire a pro or spruce up your walls yourself, a few helpful tips and tricks will ensure a successful and stress-free experience. Lastly, make sure you have a good attitude. While the act of preparing a room for a paint job may seem like an unpleasant task, it's a necessary evil if you hope to get your money's worth. Covering the old colour in a primer is less expensive than your paint If you have a wall that has been painted in a dark colour, you may want to cover it in a primer. This is a good idea because it is much less expensive than painting it in a new coat of paint. There are two main reasons you might want to use a primer to cover the old colour. First, it will block stains and blemishes from showing up in your next coat of paint. Second, it will enhance the adhesion of your new colour to the walls. The primer that you choose should be specifically formulated to match the new paint colour. You should also try to buy a high-quality primer. While some primers are made of a water-based formula, you should consider a good oil-based version. Depending on the type of primer you use, you will need to wait between 24 and 48 hours before you can start your painting project. In most cases, you should apply the primer with a brush or roller, and you should make sure to leave your walls dry for at least a day before you begin painting. Although you can find primers that claim to be able to do everything, you will likely have to do a bit more work to get your walls looking great. Paints that are designed for a variety of surfaces and uses usually have better formulations. Depending on the type of surface you are painting, you may need several coats of the new colour. Using a primer is a way to decrease the amount of time it takes to complete your project. A good primer can be used to cover your old paint in one coat. It is important to get the right paint for your job, however. Blending is a common technique used in oil painting Blending is a painting technique that is often used to create gradual colour transitions. It can also help to create soft edges in a painting and emulate the effects of sea fading. Oil paints are a great medium for blending. They are slow-drying, which allows for greater layering and greater blending. With a variety of different colours, they are ideal for creating subtle hue and tone transitions. Oil paints can be applied in thin glazes or thick impasto. They can be applied to canvas, rubber, metal, prepared paper, or any other material. They are available in a variety of thicknesses and finishes, from matte to glossy. Professional quality oil paints are highly pigmented and lightfast. In addition, they are very flexible, allowing for subtle tonal transitions. The most common type of oil paints are linseed oils. Linseed oil is derived from the seeds of flax. These oils dry through oxidation and form a paint film that is much more durable and flexible than other oils. The best brushes for blending are sable or goat hair. Using a soft brush is important. Ideally, the brush is a filbert shape. Brushes with a stiffer brush can break up the paint. If you do not have a filbert, a hog brush works well. In addition to using the blending technique, artists can also use a few other techniques. One of these is called the Alla Prima technique. This technique is particularly good for establishing loose, expressive shapes. Another technique is called the Sfumato technique. This was first developed by Leonardo Da Vinci. This technique is often used in black-and-white portrait painting. Choosing the right paint for your home Choosing the right paint for your home can be a daunting task. It's not just about choosing the perfect shade of white, though. To get the best results, it's important to consider the light in your home, as well as any structural elements. The best way to choose the paint colour for your home is to test it out before committing to any purchase. Fortunately, there are several tools available to help you make this decision. One popular tool is the colour fan deck, which can help you identify the root colours of different shades. These are often available at hardware stores and paint shops. Another option is a paint colour match app. These apps analyse photos that you upload to your phone's library. They're also available from third-party app designers. Some larger paint manufacturers have in-store colour-matching experts. These professionals can show you samples that will fit your space perfectly. Finally, it's recommended that you live with your chosen paint colour for a week or so. This will give you a better idea of how the colour feels. You should also be sure to purchase paint that is either latex or acrylic. Acrylic will work for people with allergies. For more durable and lustrous finishes, you may want to opt for enamel. Before you commit, remember that you can always paint over the wrong colour. If you're still unsure, go to your local paint store and see what they have. And don't forget to try it out on a sample board. Choosing the right paint for your home can transform the look of your home. Remember to take your time and minimise waste. It’s no secret that painting a room can be stressful and time-consuming. From the prep work to the cleaning up, the room will be unusable for several days. We hope you found our basic painting tips useful for making the most of your painting project. If you have any further questions about or need help with painting a room or house painting in general, please feel free to contact our team at  07 4448 3176  . Thanks for reading!
More Posts
estimated_quoteArtboard 3

Free Instant Quote

***Plus free bonus coupon***

Free Instant Quote!